You can take the girl out of Harley Street…..but you can’t take Harley Street out of the girl!
Laurie has a wealth of experience in and around the renowned area of Harley Street, Central London, as an expert cosmetic nurse practitioner. But over 2020’s uncertain times, when everyone was losing their regular routines and adapting to new ones, we took the decision to relocate our Harley Street practice to Oakwood, North London.
We’re delighted to say that patients are actually preferring this more private, discreet and accessible location. Privacy-conscious patients and those in the public eye are liking our more inconspicuous location (not on a High Street or on high profile Harley Street). They are also appreciating the ability to ‘drive to the door’, using a parking space on our driveway, just feet away from the clinic entrance. Public transport links are excellent too, with our clinic just a short minute’s walk from a Piccadilly Line Tube station in a leafy, residential neighbourhood.
This all allows us to deliver a more individual and personalised experience with lower footfall. Laurie takes great pleasure in watching her patients leave clinic with them both looking and feeling thoroughly refreshed and spoilt. If you’re happy, then we’re happy too!
I think we’d all like to have longer, healthy and natural-looking eyelashes, wouldn’t we? I will usually happily go off to have my nails, hair and eyelashes done; as well as eyebrow threading or waxing.
When lockdown began, I found I had just three individual eyelashes literally holding on for dear life! I have probably noticed this type of thing a little more lately because I think I’ve been spending a bit longer staring at my face in the mirror over the past couple of months, while I’ve had the time!
So anyway, when lockdown began and my natural lashes were so sparse, I wondered whether there was any kind of alternative solution while my local beautician was closed. I’d noticed a whole host of advertising from various brands about their miraculous serums and seen the photos of people showing off their long, beautiful lashes. I also thought about changing mascaras as a viable option but I wanted a really low maintenance, longer-lasting result and with minimal faff!
Of course, this came up in one of my regular phone conversations with Laurie and we had a lovely chat all about eyelashes. She happened to have some stock of RevitaLash Eyelash Conditioner which she recommended I try and she also told me the lovely background story that surrounds it.
This product – and the creation of the entire RevitaLash Cosmetics company – came about in 2006 when Dr Michael Brinkenhoff wanted to find a way to make his wife, Gayle, feel more beautiful. Gayle was going through treatment for breast cancer and had lost her hair and lashes, much to her distress. Her husband wanted to help her through her recovery; if only in a small way. He later described watching her be excited about her beautiful-looking lashes as a “real joy”. And so their RevitaLash company was born. They continue to give back a portion of their profits to support breast cancer research and education initiatives all year round.
I loved this story and in addition, this particular eyelash product certainly seemed the most popular and well-reviewed. It claimed to protect against breakage and brittleness and to improve flexibility, moisture and shine for dramatic-looking lashes. So I thought I’d give it a go.
It was super-easy to use. A nightly routine of applying a thin layer to the base of your clean and dry eyelashes. It is like a thin, liquid eyeliner with a thin brush tip which you swipe across your lash line just before bedtime. Easy! After continuing this nightly routine for 2-3 weeks, I could see a definite improvement to my lashes. They look conditioned and were growing longer. When I put my mascara on, they looked positively wow. I did have a few comments about my great eyelashes and I was really happy that people had noticed them.
Over the next three weeks I continued with the routine until my lashes reached the length that I wanted (well…I didn’t want them touching my eyebrows, did I?!) I did worry a bit that they were going to just keep on growing!
I still had a lot of product left, so I stored it in my fridge and whenever I need a top-up, I re-apply for another three weeks to keep my lashes looking fab. Conveniently, RevitaLash is available in two different sizes. If you just wanted to try it first, you can opt for the smaller, 2ml tube (approx 3 months’ supply). If you already love it as much as I do, you can opt for the larger size of 3.5ml, which should last around six months. Don’t forget to store it in your fridge. I do tend to keep a few of my opened skincare products in the fridge….it’s a wonder I still have some room for the food!
I’ve found this to be a great product. It does what it says and helps you achieve healthy, natural-looking and longer eyelashes in just three to six weeks and with minimal faff. Just as I’d wanted. I should also add it’s very gentle and safe to use and includes anti-inflammatory botanicals in its ingredients. For long term lovely lashes you will need to continue using it as I have done. The natural life cycle of our lashes means they will grow to a certain length, fall out and then start all over again.
If, like me, you’re not one of the lucky ones for whom nature has blessed with thick and longer-looking lashes, at least there is an uncomplicated remedy for those lacking in the lash department!
Now is a great time to revive and renew your skin. Restore that youthful glow and glory to your skin with Retinol. I have always thought that using topical Retinol is rather like taking your skin to the gym!
Like exercise has health-giving benefits for your body, Retinol can do the same for your skin. It is full of benefits and assists you skin to become healthier, function much better, become more resilient and slow down the process of ageing. It will also leave the skin clearer, smoother and bouncier. And it’s scientifically proven to improve fine lines, reduce pores and even treats acne.
Did you know that cosmetic surgeons in the USA prefer their patients’ skin to be in its best condition prior to surgical procedures? The canvas of the skin can be prepped by the use of the correct medically-graded skincare, in order to boost the effectiveness of the surgical enhancements being carried out.
Topical Retinol needs to be gradually eased into your skin; too much too soon will leave your skin with side effects of peeling and redness, tightness and maybe feeling a little sore. I liken these to the similar symptoms your body will experience post exercise, such as sore and achey muscles.
At your first visit to the gym, you wouldn’t try to pound out a 10k run without at least warming up first or having put in weeks of shorter distances to build your body up to it. So it makes sense not to treat your skin so quickly either. Retinol comes in different strengths, graded in percentages. You would begin with the lower percentage of active ingredient and you would also start by using a small amount and gradually increase this as your skin acclimatises to it. Any side effects can be controlled by decreasing frequency of use until your skin settles down.
Tretinoin (or Vitamin A) and Retinol are pretty much the same product. Tretinoin is the stronger cream, while Retinol is a derivative and may contain emollients (a type of moisturiser) for more sensitive skin types.
Returning to my theme of the gym, of course we could implement both types of gym work – and aim for a fabulous figure along with bouncy, baby-fresh skin for a flawless face!
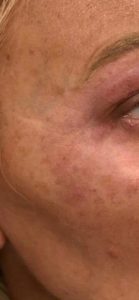
I have always taken an interest in my skin care and even more so after I started the menopause. Regrettably, I was a sun worshipper in my 20s and now, together with the ageing process, I have developed sun spots/age spots and uneven skin tone. Plus my skin is dry!
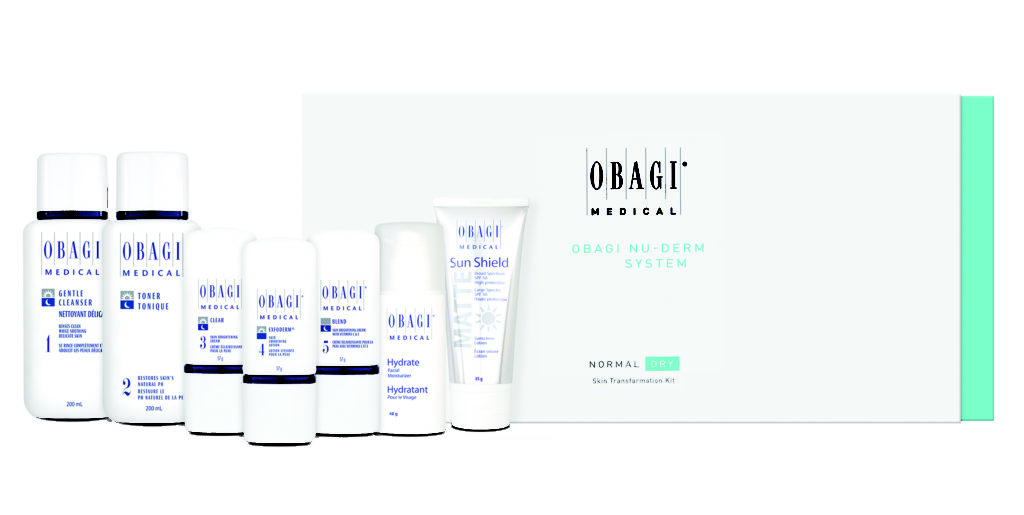
Over the years I’ve tried most skincare products, both cheap and expensive, in addition to my regular use of fake tan. I felt it gave me the appearance of a nice healthy glow, which I tended to hide behind. But then I became increasingly aware of the medical grade products from Obagi. I was reading a lot about the Obagi Nu-Derm System and had seen the great before and after photos and impressive reviews. So I decided to ask Laurie for a full skin consultation via FaceTime to see exactly what she would recommend for me. She thought the medically prescribed products in the Nu Derm Skin Transformation Trial Kit would indeed be a very good route for me to go down.
So, what did I have to lose? Laurie prescribed my kit and arranged for it to be delivered to my door. I was ready to embark on my journey to happer skin. Apart from the great reviews, Laurie picked this trial kit because she felt it would be best suited to tackling the old sun damage. You’ll be pleased to hear I don’t sit in the sun all day long these days. I worship my skin, not the sun!
I was super excited when my kit arrived, comprised of 6 products (Gentle Cleanser, Toner, Clear, Exfoderm, Blender and Sunshield in a beautiful white Obagi make up bag). To ensure I had the full recommended regime, I also purchased Obagi Vitamin C 15%, Obagi Tretinoin and Obagi Hydrate Luxe. I was all ready to go! I applied the products in the order as stated, both morning and night. Each product in the kit was labelled 1 to 6 and with AM or PM indicated on them, which helped me quickly get into the correct routine.
At the beginning…
Week 1
Great! First week completed and here are my skin diary findings:
My skin felt very clean, smoother and slightly tighter. My pores looked smaller, especially on my nose. Some brown spots had reduced a little in colour. I did experience some irritation above my eyebrows in the form of red patches which felt slightly itchy. Overall my skin felt nourished; despite the irritation.
Week 2
With not a hint of fake tan in sight, my skin had colour! Now I had a healthy, rosy, glow of my own. Finally the blood was flowing back into my skin!
I experienced some flakiness, redness and slight irritation and my skin felt dry. I had visible fading of my brown spots, the darker ones looking reduced. Some smaller ones had completely gone, my pores seemed smaller and the irritation had subsided. Overall, very impressed!
Week 3
This week was a different ball game. On waking, my skin was flaking/shedding even more and was very dry, again with slight irritation and redness. However, once I’d popped on my products, all seemed nourished and smooth again. I felt this kit was really working and I can honestly say I was starting to get the results I’d hoped for. And in just a short time. So far, so good!
Week 4
Over halfway through the trial kit. This week my skin was looking great and very clear. Pores were almost non-existent and my brown spots had faded some more. The bigger brown spots were still slightly visible but as I said before, my smaller ones had gone! Still some slight redness, dryness and shedding but my skin looked healthy with its natural redness and glow. Overall, my skin looked even clearer and with minimal side effects.
Week 5
My skin was totally acclimatised to these products now. Hooray! Minimal shedding, no redness or irritation. Wow. My skin was so much clearer and the larger brown spots had really decreased in colour and nearly disappeared. (Believe me, I always had a lot of brown spots hidden away under my make-up!)
Week 6
… At the end of week 6!
My last week of the trial. I had absolutely no peeling/shedding , irritation or redness. Everything looked great. I had been a little concerned about my anti-wrinkle injections being overdue during lockdown and about how long I might have to wait for my next treatment. But my forehead now felt tight. On raising my eyebrows, there was hardly any movement. I was feeling quite a bit better about the wait for clinics to re-open. There was a natural rosiness to my skin, which was smooth and clear and it looked and felt tighter with hardly any visible pores. Fantastic results…. I was very happy!
I have to add that I religiously stuck to this programme morning and night in order to achieve these results. If you do purchase a kit for yourself, please be sure to stick with it for the entire trial period!
My tip: If you do get a lot of skin shedding (around the nose and chin are the most common areas) or a slight feeling of soreness or stinging, stop the Blender and Tretinoin for a night or two. I did this and everything completely settled down again and I re-started the complete regime.
So in summary, after the six weeks of the trial kit, yes you are able to see some great results if you’ve followed it fully. I’ve been advised that for even better effects, 18-24 weeks is the recommended protocol. So I may do kit number two soon, as I was so pleased with the initial outcome and really want to keep this going.
The Nu-Derm Skin Transformation kit has not only made my skin clearer; the pale and pasty face that used to look back at me in the mirror after my fake tan had worn off is no longer staring at me. I actually have some natural colour to my face. Laurie is also very pleased to hear this too, as she’s been subtly nagging me to give up the fake facial tan for a while now!
The Obagi Nu-Derm System Skin Transformation Kit
If you’re interested in trying out this trial kit for yourself please contact Julie!
Laurie Arias uses cookies to improve your site experience .AcceptFind out more


 By Julie Fell, Practice Manager

 At your first visit to the gym, you wouldn’t try to pound out a 10k run without at least warming up first or having put in weeks of shorter distances to build your body up to it. So it makes sense not to treat your skin so quickly either. Retinol comes in different strengths, graded in percentages. You would begin with the lower percentage of active ingredient and you would also start by using a small amount and gradually increase this as your skin acclimatises to it. Any side effects can be controlled by decreasing frequency of use until your skin settles down.